How to create and use an ML model on Amorphic?

info
- Follow the steps mentioned below.
- Total time taken for this task: 60 Minutes.
- Pre-requisites: User registration is completed, logged in to Amorphic and role switched
Tidbits
- Let's predict telecom customer's churn using a model.
- There are two ways to create an ML model for this workshop.
- Step1: Build a prediction model in tar.gz format
- a) Using an ML notebook or
- b) Use an existing model created for this workshop. Use this method if you are not comfortable running code on an ML notebook.
- Step2: Create an ML model and predict in Amorphic
- a) Using
OutputTypeasMetadata. Prediction results will show up on a screen or an S3 file. - b) Using
OutputTypeasDataset Data. The results will be written to an output Dataset, concatenating the input file. This uses pre-processing and post-processing glue jobs.
- a) Using
- Step1: Build a prediction model in tar.gz format
Step2-a: Create an ML model in Amorphic with OutputType as Metadata
- Click on 'MACHINE LEARNING' --> 'ML Models' from left navigation-bar.
- Click on ➕ icon at the top right corner to create a new ML model.
- Enter the following information and click create.
Model Name: telecom-churn-prediction-<your_userid>
Description: This model predicts telecom churn.
Existing Model Resource:
Artifacts Location: s3://wsaar-us-east-1-9XXXXXXXXXXX-wkr-ml-temp/ChurnPrediction-ankamv/output/xgboost-2021-06-03-06-53-27-718/output/model.tar.gz | or your own model created in an ML notebook.
                    Note: Replace 9XXXXXXXXXXX with an account number from 'Dataset S3 Location' of the Dataset 'telecom_churn_prediction_metadata' or any other dataset created by you.
Output Type: Metadata
Algorithm Used: XGBoost
Supported File Formats: csv
PreProcessed Glue Jobs: Not Applicable(N/A)
PostProcessed Glue Jobs: Not Applicable(N/A)
Keywords: ML, Model


- Once you click 'create', you will get a message 'Model created successfully'.
Step2-a: Predict using telecom-churn-prediction-<your_userid> model
- Go to a
telecom_churn_prediction_metadataand click onFilestab. Note that this Dataset has a pre-processed test file. - Click on
three dotsin front of the file. - Click on
Apply ML. Choose type as 'ML Model', ML model as 'telecom-chrurn-prediction-<your_userid>', and instance type as 'ml.m5.large' as shown below. - Click submit.
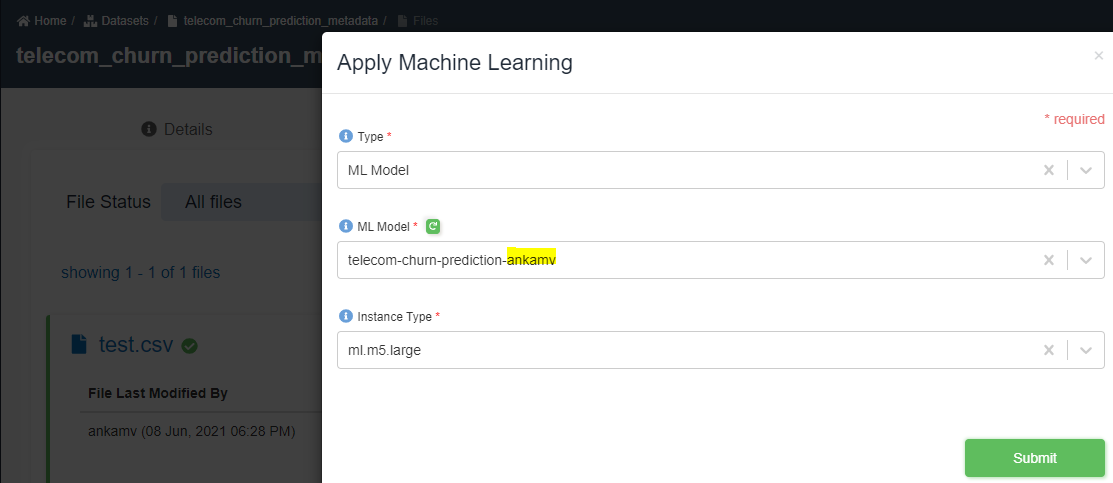
- You will get a message 'Advanced analytics invoked'. Click OK.
- Click on
Reload Invocationsbutton. If the result isN/A, the process is not completed yet. This will take at least 10 minutes to trigger the process and finish. - Once finished, you will see 👁️ icon in the result.

- Click on the 👁️ icon to check the results.
- Results will be stored on S3 and also displayed as shown below. Note that values in the result are separated by '\n'.

- Value '0.012032742612063885' indicates that the customer has a very low probability of churning out.
Now, let's try to predict using the second method to write output to a Dataset.
Step2-b: Create telecom_churn_prediction_userid Dataset
- Click on 'DATASETS' --> 'Datasets' from left navigation-bar.
- Click on ➕ icon at the top right corner.
- Enter the following information.
{
  "Dataset Name": "telecom_churn_prediction_<your_userid>"
  "Description": "Output dataset for Telecom churn predictions. The target location is Redshift."
  "Domain": "workshop(workshop)"
  "Data Classifications":
  "Keywords": "Retail"
  "Connection Type": "API (default)"
  "File Type": "csv"
  "Target Location": "Redshift"
  "Update Method": "Append"
   "My Data Files Have Headers": "Yes"
  "Custom Delimiter": ","
  "Enable Malware Detection": "No"
  "Enable Data Profiling": "No"
}
- Click on 'Register' button at the bottom to move to the next step.
- Click on the following CSV file to download it to your computer.
Sample Telecom Predictions File
- Click on 'Click to upload' to upload the file that is downloaded in above step.
- Click on 'Extract Schema' as shown below.
- You will get a message 'File uploaded successfully'. Click OK.
- A new screen will appear with the schema extracted.
- Change the 'Sort Key Type' to None.
- Click on 'Publish Dataset'. You will get 'Completed the registration process successfully' message. Click OK.
Step2-b: Create an ML model in Amorphic with OutputType as Dataset data
- Click on 'MACHINE LEARNING' --> 'ML Models' from left navigation-bar.
- Click on ➕ icon at the top right corner to create a new ML model.
- Enter the following information and click create.
Model Name: telecom-churn-prediction-datasetdata-<your_userid>
Description: This model predicts telecom churn. `OutputType` as `Dataset data`.
Existing Model Resource:
Artifacts Location: s3://wsaar-us-east-1-9XXXXXXXXXXX-wkr-ml-temp/ChurnPrediction-ankamv/output/xgboost-2021-06-03-06-53-27-718/output/model.tar.gz | or your own model created in an ML notebook.
                    Note: Replace 9XXXXXXXXXXX with an account number from 'Dataset S3 Location' of the Dataset 'telecom_churn_prediction_metadata' or any other dataset created by you.
Output Type: Dataset Data
Input Schema: Click 'Import From Dataset', choose 'Telecom_Churn_Source_Dataset', and click import or you may paste the content -->   [{"name":"State","type":"varchar(256)","Description":"a"},{"name":"AccountLength","type":"bigint","Description":"a"},{"name":"AreaCode","type":"bigint","Description":"a"},{"name":"Phone","type":"varchar(256)","Description":"a"},{"name":"IntlPlan","type":"varchar(256)","Description":"a"},{"name":"VMailPlan","type":"varchar(256)","Description":"a"},{"name":"VMailMessage","type":"bigint","Description":"a"},{"name":"DayMins","type":"double precision","Description":"a"},{"name":"DayCalls","type":"bigint","Description":"a"},{"name":"DayCharge","type":"double precision","Description":"a"},{"name":"EveMins","type":"double precision","Description":"a"},{"name":"EveCalls","type":"bigint","Description":"a"},{"name":"EveCharge","type":"double precision","Description":"a"},{"name":"NightMins","type":"double precision","Description":"a"},{"name":"NightCalls","type":"bigint","Description":"a"},{"name":"NightCharge","type":"double precision","Description":"a"},{"name":"IntlMins","type":"double precision","Description":"a"},{"name":"IntlCalls","type":"bigint","Description":"a"},{"name":"IntlCharge","type":"double precision","Description":"a"},{"name":"CustServCalls","type":"bigint","Description":"a"},{"name":"Churn","type":"boolean","Description":"a"}]
Output Schema: Click 'Import From Dataset', choose above 'telecom_churn_prediction_<your_userid>', and click import or you may paste the content -->  [{"name":"State","type":"varchar(256)","Description":"a"},{"name":"AccountLength","type":"bigint","Description":"a"},{"name":"AreaCode","type":"bigint","Description":"a"},{"name":"Phone","type":"varchar(256)","Description":"a"},{"name":"IntlPlan","type":"varchar(256)","Description":"a"},{"name":"VMailPlan","type":"varchar(256)","Description":"a"},{"name":"VMailMessage","type":"bigint","Description":"a"},{"name":"DayMins","type":"double precision","Description":"a"},{"name":"DayCalls","type":"bigint","Description":"a"},{"name":"DayCharge","type":"double precision","Description":"a"},{"name":"EveMins","type":"double precision","Description":"a"},{"name":"EveCalls","type":"bigint","Description":"a"},{"name":"EveCharge","type":"double precision","Description":"a"},{"name":"NightMins","type":"double precision","Description":"a"},{"name":"NightCalls","type":"bigint","Description":"a"},{"name":"NightCharge","type":"double precision","Description":"a"},{"name":"IntlMins","type":"double precision","Description":"a"},{"name":"IntlCalls","type":"bigint","Description":"a"},{"name":"IntlCharge","type":"double precision","Description":"a"},{"name":"CustServCalls","type":"bigint","Description":"a"},{"name":"Churn","type":"boolean","Description":"a"},{"name":"Predicted","type":"boolean","Description":"a"}]
Algorithm Used: XGBoost
Supported File Formats: csv
PreProcessed Glue Jobs: ChurnPrediction_Preprocessing   <-- You have read access to this job. Let us know if you don't see this job even after refresh.
PostProcessed Glue Jobs: ChurnPrediction_Postprocessing  <-- You have read access to this job. Let us know if you don't see this job even after refresh.
Keywords: ML, Model


- Once you click 'create', you will get a message 'Model created successfully'.
Step2-b: Predict using above telecom-churn-prediction-datasetdata-<your_userid> model
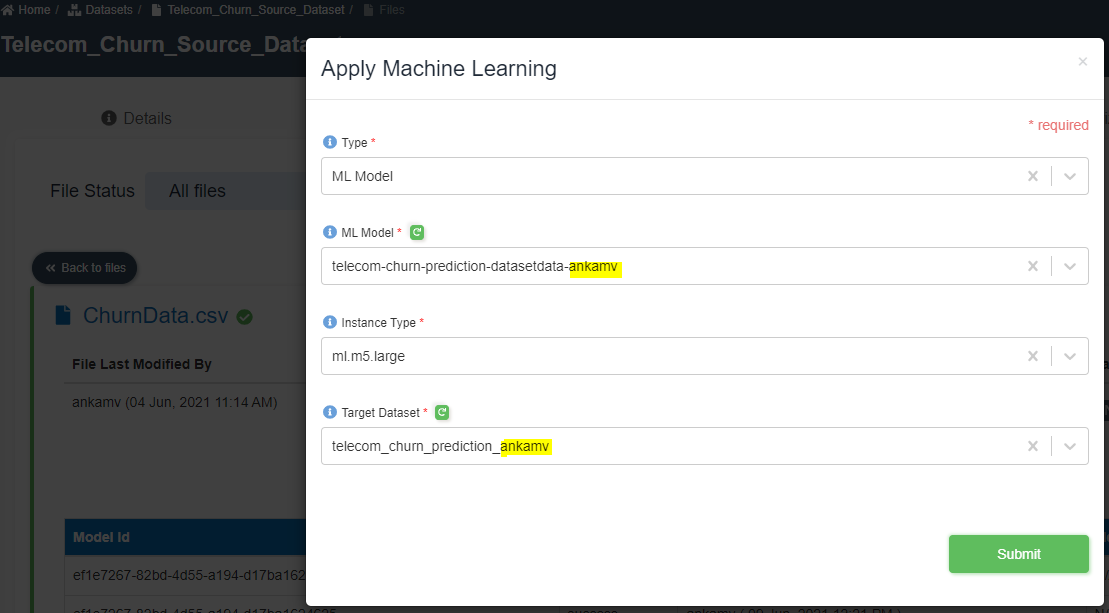
- Go to a
Telecom_Churn_Source_Datasetand click onFilestab. - Click on
three dotsin front of the file. - Click on
Apply ML. Choose type as 'ML Model', ML model as 'telecom-churn-prediction-datasetdata-<youruserid>', instance type as 'ml.m5.large', and target datset as 'telecom_churn_prediction<your_userid>' as shown below. - Click submit.
- You will get a message 'Advanced analytics invoked'. Click OK.
- Click on
Reload Invocationsbutton. If the result isN/A, the process is not completed yet. This will take at least 10 minutes to trigger the process and finish. - Once finished, you will see the status as
successas shown below.

- Go to output dataset using the navigator.
- Click on
Filestab. Download the output file 'ChurnData_predicted-0.csv'. Content of the looks similar to the following picture. Note the last two columns - actual churn and predicted by model.

tip
- This model can be used in Amorphic workflows as well.