How to create an entity recognizer on Amorphic?

info
- Follow the steps mentioned below.
- Total time taken for this task: 60 Minutes.
- Pre-requisites: User registration is completed, logged in to Amorphic and role switched
Tidbits
- Amorphic's entity recognizer is built on top of Amazon Comprehend.
- It uses natural language processing (NLP) to extract insights about the content of documents.
- It develops insights by recognizing the entities, key phrases, language, sentiments, and other common elements in a document.
Create an entity recognizer
- Click on 'MACHINE LEARNING' --> 'Entity Recognizers' from left navigation-bar.
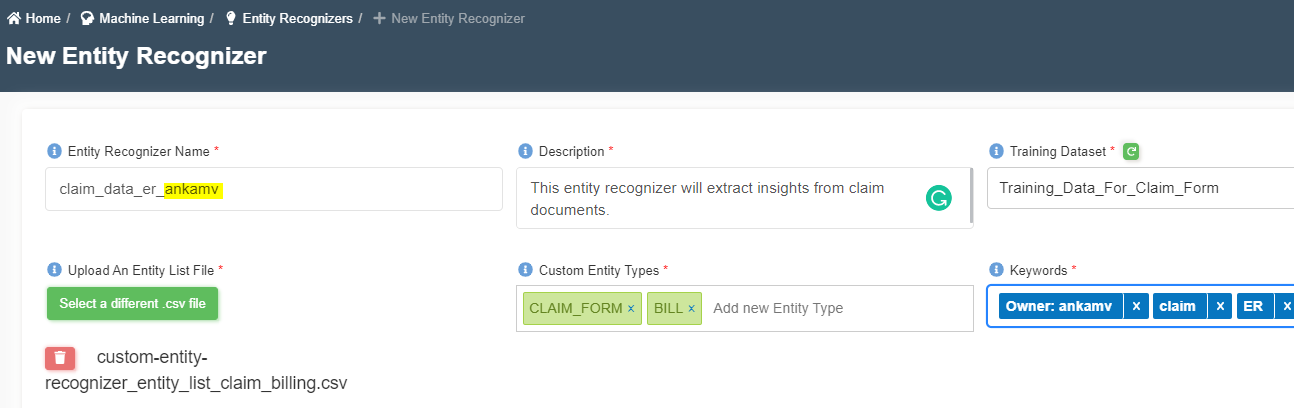
- Click on ➕ icon at the top right corner to create a new entity recognizer.
- Enter the following information and click create.
- Click here to download an entity list file.
Entity Recognizer Name : claim_data_er_<your_userid>
Description: This entity recognizer will extract insights from claim documents.
Training Dataset: Training_Data_For_Claim_Form    <-- You have read access to this Dataset. If you can't access, please contact admin.
Upload An Entity List File: Upload above `custom-entity-recognizer_entity_list_claim_billing.csv` file.
Custom Entity Types: CLAIM_FORM  BILL   <-- Enter these entities and hit enter or tab. Only capital letters are allowed. Note that 'CLAIM_FORM and BILL' are from the 'type' column of above entity file.
Keywords: claim, ER
- Once you click 'create', you will get a message 'Entity Recognizer registered'
- Initial status will be 'SUBMITTED'. The status will change from 'SUBMITTED' to 'TRAINING'.
- The training phase takes about 15 minutes. Once the training is finished, the status will turn to 'TRAINED'.
- Once trained, you will see
Total Trained Documents,Total Test Documents, andEvaluation Metricsas shown below.

Recognize entities for a new file
- Create a dataset.
- Click on 'DATASETS' --> 'Datasets' from left navigation-bar.
- Click on ➕ icon at the top right corner.
- Enter the following information and click 'Register'.
{
  "Dataset Name": "claim_forms_ds_<your_userid>"
  "Description": "Claim forms dataset."
  "Domain": "workshop(workshop)"
  "Data Classifications":
  "Keywords": "claims"
  "Connection Type": "API (default)"
  "File Type": "txt"
  "Target Location": "S3"
  "Update Method": "Append"
  "Enable Malware Detection": "No"
  "Enable AI Services": "Yes"
  "Enable Data Cleanup": "No"
}
- Click on
Filestab. - Right click here and click 'save link as' to save a sample claim file.
- Upload it using
Upload Dataicon. - Click the 🔄 icon to refresh the status. Status of the file will turn from 🟠 to ✔️.
- Click on
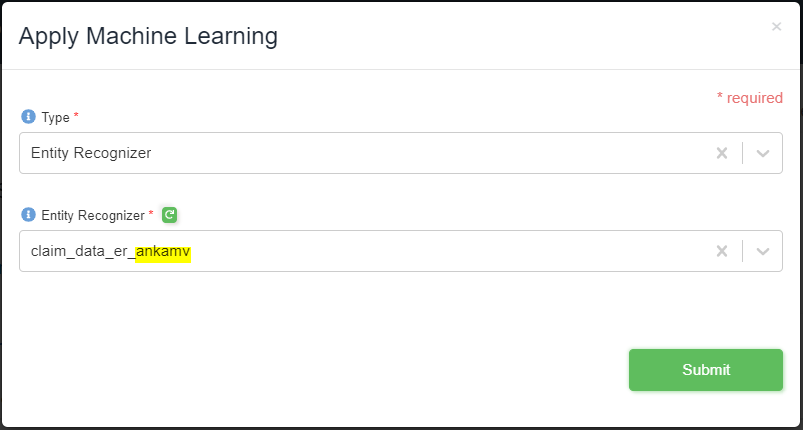
three dotsand then click onApply MLas shown below.

- Choose type as
Entity Recognizerand entity recognizer asclaim_data_er_<your_userid>as shown below. Note: Entity recognizers will show up after training phase only.
- Click
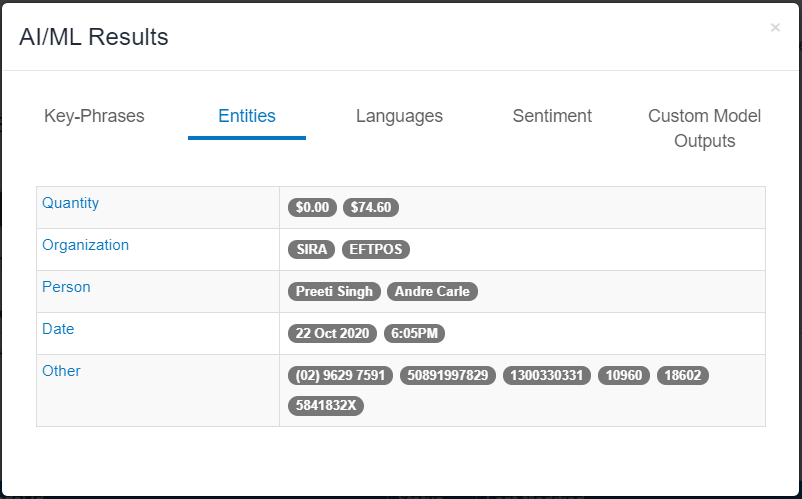
Sumbit. You will get a messageAdvanced Analytics Invoked. Click OK. - Click on
Reload Invocationsbutton. If the result isN/A, process is not completed yet. This will take at least 10 minutes to trigger the process and finish. - Once finished, you will 👁️ icon in the result. Click it to view the result. It will be similar to the following picture. if you get any error, follow the below tip.
tip
- Dataset details page will have a new item called
Dataset AI/ML Results. Click the button to retrieve AI/ML results.